Install windows 8 in VHD and dual boot with windows 7

If you need a backup of the current system follow the bellow steps.if anything went wrong it may help.The first thing that you’ll want to do is create a System Image from within Windows7’s Backup and Restore. When you do, you’ll end up with a complete image of your hard disk. That way, if anything out of the ordinary were to occur as you follow the steps for creating a dual-boot system, you will be able to return to your current configuration. Furthermore, I recommend that you also create a separate backup of your data. Maybe just make copies of all your data files on CD/DVD or on an external hard disk. While it may sound like overkill, having an extra backup will give you peace of mind. To create a system image, you’ll need to have a CD-RW/DVD-RW drive, an external hard disk, or access to a network drive. To access Backup and Restore, click the Start button, type Backup in the Search box, and press [Enter] when Backup and Restore appears in the result pane.
Once you have Backup and Restore up, select the Create a System Image option and choose your backup location. As you can see in Figure A, I used an external hard disk attached to this system.
Figure A

On my test system, I’ll use an external hard disk to create my system image.
As you can see in Figure B, on this test system there is only one partition. To initiate the operation, just click Start backup. On my test system with a 500GB hard disk, it took just over an hour to create a System Image on an external hard disk.Figure B

Creating a System Image on an external hard disk is easy.
When the System Image is complete, you’ll be prompted to create a System Repair disc, as shown in Figure C. This is the disc that you will use to boot your system and restore your system image in the event that you need it.Figure C

When the System Image is complete, you’ll be prompted to create a System Repair disc.
Setting up a VHD and install windows 8
With your System Image completed, you’ll use the Disk Management tool to create the VHD on which you will install Windows 8. To launch Disk Management, click the Start button, type Disk Management in the Search box, and press [Enter] when Create and format hard disk partitions appears in the result pane. When Disk Management launches, pull down the Action menu and select the Create VHD command.OR you can follow bellow steps if you are directly booting from a windows 8 install disc.
Step 1: First step is to download Windows 8 ISO file. After downloading the ISO file you have to burn it on a DVD or a bootable USB drive.
Step 2: After you got the ISO file on a DVD or USB then connect the USB or insert DVD into the computer. Now restart the computer and change the BIOS settings according to the bootable media you selected. Now the PC will boot using the media selected.
Step 3: You have to wait for some time (depending on the speed of the computer) till this screen appears.
Step 4: Now when the screen appears you have to open command prompt. Press shift key + F10 to open the command prompt.
When you see the command prompt window on the screen carry out the following commands one by one.
1. Diskpart
2. List disk
3. Select disk 0
2. List disk
3. Select disk 0
(Here select the disk on which the current windows is running. Do not select your USB)
4. List Vol
5. Create vdisk file=E:win8.vhd maximum=30000 type=expandable
5. Create vdisk file=E:win8.vhd maximum=30000 type=expandable
(In the above command make changes
according to the drive. You just have to change “E” with the other drive
letter. A minimum of 30GB for VHD is recommended)
6. Select vdisk file=E:win8.vhd
7. Attach vdisk
8. Exit
7. Attach vdisk
8. Exit
Step 5: With the exit command, the command prompt window will close and now you have to select the Language, current format, input method. After you are done with this press the NEXT button.
You will then see INSTALL NOW button.
Installing Windows 8
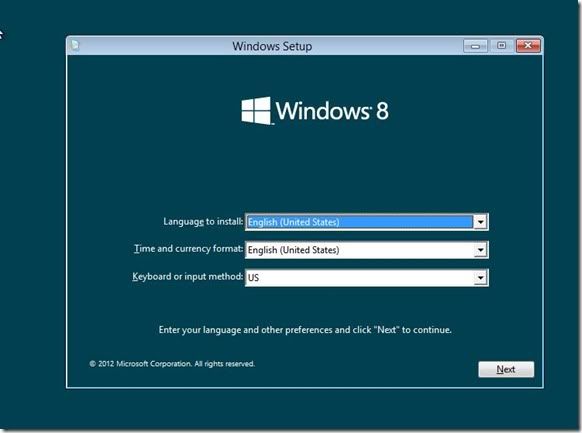
Now that you have your VHD established, installing Windows 8 in a dual-boot configuration should be a pretty straightforward operation. Let’s take a closer look.To begin, insert the Windows 8 Release Preview DVD and reboot your system. After a few minutes, you’ll see the Windows Setup screen shown in Figure H and will specify your language settings before clicking Next.
Figure H

The first step in the installation is to specify your language settings.
Once the initial steps are taken care of, you’ll see the Windows Setup screen shown in Figure I and will click the Install Now button. However, keep in mind that we aren’t exactly ready to install Windows just yet; you must first access your VHD.Figure I

While you will click the Install Now button, you’re not quite ready to install Windows 8.
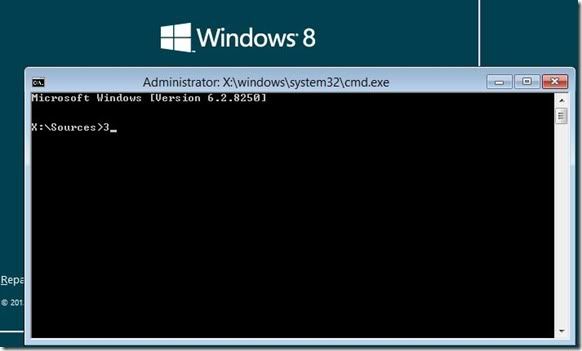
When you see the next Windows Setup screen, you will immediately press Shift +F10 to open an Administrator Command Prompt window as shown in Figure J.Figure J

When you press Shift-F10, you’ll see an Administrator Command Prompt window.
To prepare your VHD you’ll use the command Diskpart utility. Follow these steps:- Type the command:
diskpart
- Once the Diskpart environment is ready, you’ll use the select command to instruct Diskpart to access your VHD file as follows:
select vdisk file=c:\VHDs\Windows8RP.vhd
- After you have selected the VHD file, you’ll use the attach command to essentially connect the VHD to your system as follows:
attach vdiskThis entire procedure is illustrated in Figure K.
Figure K

After each command, you should see a success message.
Once you are done, you can type exit to leave the Diskpart environment and then click the Close button the close the Administrator Command Prompt window. When you return to the Windows Setup screen, you select the Custom option, as shown in Figure L.Figure L

Make sure that you select the Custom Install Windows only option.
At this point, Windows Setup will prompt you to choose the location to which you want to install Windows 8 and you can now select your VHD, which will be designated as Unallocated Space and be the size that you specified.As you can see in Figure M, I have selected my 50GB VHD. Keep in mind that when you select the VHD, you’ll see a Warning message that says that Windows cannot be installed to this disk. Even though Windows Setup displays this warning message, you can ignore it as the procedure does indeed function correctly. In fact, the installation procedure will progress quite rapidly and restart several times as it completes the installation on the VHD - just like it would on a normal hard disk.


